![]()
 SWAG: Software
Architecture Group
Setting Up And Using The LDX-BFX Pipeline
By Nikita Synytskyy, based on the original README by Jingwei WuMar 04, 2004, updated for LDX-BFX Sept 29, 2004
The structure of this document
This document consists of two sections. The first one, with its titles numbered by numeral, describes the steps necessary to successfully install the QLDX pipeline on your computer and derive, from a given piece of software, a factbase which you can query or visualize.
The second part, with its titles numbered by letter, deals with issues that are not directly related to setup or execution, but nevertheless are, or at least can be, very important when working with the pipeline. For best results, read the whole document before you start installing or extracting, and then use it as a reference while installing or extracting.
0. Introduction
The LDX-BFX pipeline is a reverse engineering fact extraction and analysis tool written by Jingwei Wu at the University of Waterloo. It works by replacing the linker that comes with GCC with a custom linker, which not only performs the linking, but also records a number of facts about the work it performs. Additional information is extracted by analyzing the object files generated during the build process. These facts can then be examined and manipulated to study the architecture of the software being built.
The QLDX pipeline has been applied to several large pieces of software, and is very reliable. To apply the pipeline to a new piece of software, you need to undertake these general steps:
- Set up QLDX on your computer and define certain environment variables, so that all pieces of QLDX know where they are;
- Temporarily replace the standard GNU linker (ld) with QLDX linker (lde), so that lde and not ld is used for linking;
- Compile and link your software;
- Collect the fact files generated by the QLDX linker, unite them in a single database, and perform post-processing;
- [optional] Reverse step 2 above, and restore the GNU linker as being default.
1. Setting up QLDX
QLDX setup is very straightforward. You need to put all QLDX files in a directory of your choice, define an environment variable called QLDX to point to that directory, and add the /bin subdirectory to the search path. For example, if your QLDX files are located in /home/username/bin/QLDX, you will do this by typing the following:
$ export QLDX=/home/username/bin/QLDX
$ export LD_LIBRARY_PATH=$QLDX/lib/ld
$ export PATH=$QLDX/bin:$PATH
You need to have Java 1.5 installed on your computer before you can run QLDX. If you do not have Java installed, or if you use an earlier version (1.4 or earlier) the pipeline will not function properly.
At the moment, the QLDX pipeline works on Linux only.
2. Replacing ld with custom linker
To replace the GCC linker (ld) with a custom linker (lde), you have to create a symbolic link to lde named "ld" and change your PATH variable in such a way that your symbolic link will be found before the GCC linker. This can be done, for example, by placing the symbolic link to lde in your ~/bin directory, and changing the PATH variable so that ~/bin is searched first:
$ ln -s $QLDX/bin/lde ~/bin/ld
$ export PATH=~/bin:$PATH
Verify that the linker has been replaced by typing
$ which ld
If the command displays the pathname of the symbolic link you've just created, the replacement has been successful.
3. Compile and link your software
Use GCC to build your software as you normally would. If you were able to build your software before QLDX installation, you will have no problems with the build. You will find that in addition to the files normally generated through out the build, some (possibly many) .ta files have been generated. These files are the output of the custom linker, and contain facts about the structure of the software you are building.
4. Database building and post-processing.
You next need to combine all the .ta files generated into a single database. To do this, you must enter the top-level directory that contains your software project, and issue the following command:
$ cat `find $PWD -name "*.ta"` > software.ldx.taThis will aggregate all the .ta files generated in a file called "software.ldx.ta"
The custom linker, lde, produces a good deal of information about the software, but that information alone is not sufficient. The lde extractor captures dependencies between different object files, but several kinds of dependencies that exist between two items within a single object file are not captured.
For that reason, a separate fact extraction program, called bfx has to be applied to the object files generated during the build process, to complete the information extracted by lde. You can do this with the following command:
$ bfx `find $PWD -name "*.o"` -o software.bfx.taThe -o filename switch instructs bfx where to store the output information (in this case, in a file named software.bfx.ta.)
When some smaller programs are built, no permanent object files are left behind - the compiler uses temporary object files, which are deleted after linking. In these cases, the build process has to be modified so that the object files are available for analysis. This can be done by building the program in two steps: compiling the source files to obtain the object files, and then building the executable from the object files.
Note: If the software you're building makes use of system libraries (which is exceedingly common), the file software.ldx.ta contains all data from system libs, because it is generated with lde, which looks at relationships between various object files, both system and user-built. On the other hand, software.bfx.ta contains no data from system libraries, because it is generated using bfx, which only examines the user's object files, and therefore knows nothing about system libraries.
The information in the database needs to be further processed before it can be used. QLDX comes with a series of scripts to perform the preprocessing, and a special language, QL, to execute them. You will next have to issues these preprocessing commands:
$ ql $QLDX/script/prep.ql software.ldx.ta software.bfx.ta software.prep.ta
$ ql $QLDX/script/lower.ql software.prep.ta software.ld.ta
$ ql $QLDX/script/alv.ql software.ld.ta software.alv.ta
After the execution of alv.ql, the result, software.alv.ta contains the "as-linked" view (ALV) of the software under analysis. This view shows how various entities in the software are linked together. The ALV structure can be explored and queried with tools that can process .ta files, such as Grok and QL. QL is supplied with every QLDX pipeline installation.
If you wish to visualize the software structure graph you have derived, you need to perform more processing to build a viewable landscape. The containment structure in ALV is not always a tree, and that can confuse the landscape viewing tools currently available. To remedy the situation, you can use the supplied scripts to derive the "as-store" view (ASV) of the software. The storage containment structure is directory-based and is always a tree. To derive the ASV you can use the command:
$ ql $QLDX/script/asv.ql software.alv.ta software.asv.ta
The final step is to add the schema to the extracted facts:
$ schema software.asv.ta software.ls.ta
Finally, you can use the landscape editor software to view it
$ lsedit software.ls.ta
Both schema and lsedit are supplied with the QLDX pipeline.
5. Reverting to GCC linker
If you want to stop using the linker that comes with QLDX, you can do it either by deleting the symbolic link you created in step 2, or by altering the PATH variable so that the GCC linker is found before the symbolic link you have created. The latter will happen on its own once you close the shell you were using for your analysis (see section on shell variable persistence below).
A. Shell variable persistence
The shell variables you define using the "export" command do not have a permanent life, nor universal scope. An exported variable will be available in the instance of the shell it was defined, and in all subprocesses spawned by the shell. It will not be available to other shell instances running in parallel, or to the parent process of the shell.
This has direct impact on the functioning of QLDX, because QLDX itself depends on certain variables being defined. If you define the $QLDX variable as outlined in step 1, the variable will be available (and QLDX will function correctly) only in the shell the variable was defined. In other shells, the variable will remain undefined, and QLDX will not work properly.
If you think that you will be using QLDX frequently, consider placing crucial variable definitions (such as that of the QLDX variable and the addition of the $QLDX/bin directory to the path) in your shell's startup files.
B. Creating your own containment structure
The containment structure found in the ALV file is derived from the linking process. It represents the "concrete" or real containment structure of the software being analyzed. However, this may not be the containment structure you want. First of all, the containment structure is likely to be very complex, and not very useful in getting the "bird's eye" view of the system. Second, it may not necessarily be a tree - and for all but the simplest of projects, it won't be. Because the visualization tools currently available need the containment structure to be a tree, you won't be able to visualize your ALV - if that's what you want to do.
The ASV (as-stored view) file, if you choose to derive it, bases its containment structure on the directory hierarchy. The top directory is considered to be the root of the hierarchy; every sub-directory is considered to be a subsystem, and every object file contained in the directory is considered to belong to that subsystem. This view is guaranteed to be a tree, and thus is always possible to visualize, but may not necessarily reflect the true structure of the system.
To remedy that situation, QLDX allows you to create your own containment structure to replace the automatically derived one. To do this, you have to create a "contain file" that specifies, for each object file in your project, where it is contained. For example, if you have three object files, main.o, functions.o and logging.o that make up an executable program.exe, and you want to assign functions.o and logging.o to subsystem lib, your contain file would look as follows:
contain program.exe main.o
contain program.exe lib
contain lib functions.o
contain lib logging.o
To apply the contain file to your landscape, you need to execute another script:
$ ql $QLDX/script/addcon.ql software.contain software.alv.ta software.my.ta
$ asview software.my.ta software.ls.ta
$ lsedit software.ls.ta
You do not need to specify what the entries in the contain file are. Anything not already a file will be automatically treated as a subsystem.
There are restrictions on the containment structure you define. First of all, it has to be a proper tree. No entity can be contained by more than one other entity, and no circular containment is permitted. Second, while you can add subsytems to the containment structure, you cannot add new files to it. All the files in your new containment structure must already be present in the ALV file, or the containment addition script will fail. Thirdly, any files present in the ALV but not in the new containment structure will be removed from the results. This provides a useful tool for eliding your system view, but should be used with caution, lest interesting files be removed by accident.
!!!TODO!!! The complete list of files can be extracted from the ALV with the files.ql script, which possibly has a bug in it. If the file list is not correct, the addcon.ql script will complain and either fail or delete some files from the view. It is also possible that addcon.ql is afflicted by the same bug as files.ql. This page will be updated as soon as the status of the bug fixes becomes clear.
C. As-linked view (ALV) schema
The drawing below shows an enhanced schema for the data extracted by the QLDX pipeline.
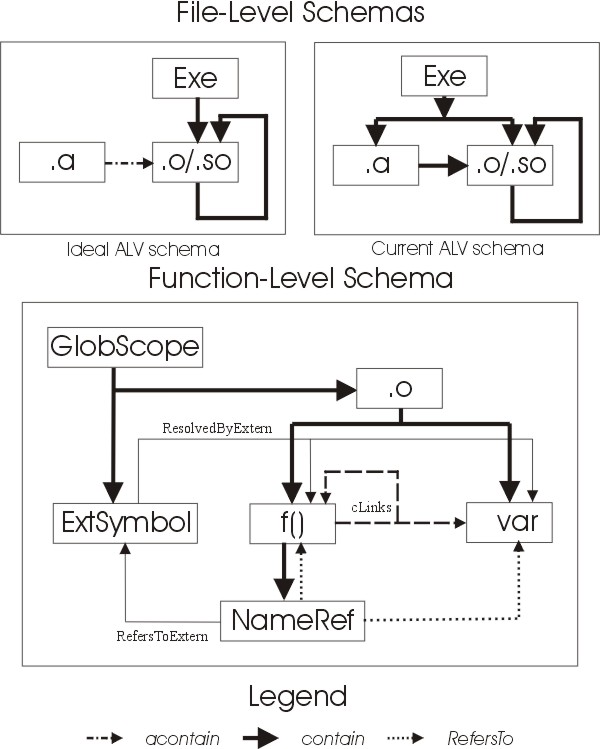
Schemas shown. Even though the ALV has only one schema, for clarity and comprehension purposes, it is useful to split it into two levels: file-level and function-level schemas. You can imagine the function-level schema as being a continuation of the file level schema, with the box labelled .o in the function-level schema mapping to the box labelled .o/.so in the file-level schema.
Abbreviations used. The meanings of box labels are as follows:
- Exe: Executable file
- .o/.so: Object file or dynamic link library
- .a: Archive file
- GlobScope: global scope, which contains all symbols not resolved within a single object file
- ExtSymbol: external symbol - a symbol which is not defined in an object file but is referenced in it
- f(): a function
- var: a variable
- NameRef: a named reference (to a function or a variable).
File level schema. The file level schema has only the contain relation. At the file level, we deal with executable files, which contain (i.e. are made up of) archive files, object files, and dynamic libraries. Archive files can contain object files, and object files and dynamic libraries can contain more object files or dynamic libraries.
Ideal vs. current schema. The file-level schema currently generated is different from the ideal. The difference has to do with QLDX's handling of archive (.a) files. Ideally, executable files should not contain archive files. Instead, executable files should contain only object files and dynamic libraries. If some object files making up the executable were contained in an archive file, this should be denoted by a separate relation acontain, going from the archive file to the appropriate object files. This is the ideal ALV schema.
At present, however, no distinction between acontain and contain is made, and both are treated as contain. This may be fixed in future releases of QLDX. Meanwhile, it is possible to convert data to the ideal schema by factbase manipulation.
Function-level schema. At the function levels, the object files contain functions and (global) variables. The functions in turn contain named references, which represent function calls and variable access. A named reference can refer to a function/variable within the same object file (via RefersTo relation) or to a function/variable outside the current object file (via RefersToExtern relation). The target of RefersToExtern is the External Symbol, which is contained in the global scope. The External symbol is resolved to either a function or a variable in some object file; this is depicted via the ResolvedByExtern relation.
The cLinks relation. The cLinks relation is not extracted; rather, it is derived from RefersTo and RefersToExtern/ResolvedByExtern relations. Most of the time, the precise mechanics of a link between the two functions is not relevant to software engineering: it is not necessary t know that a function contains a named reference, which refers to an external symbol, which is resolved by an external function or variable. Therefore, this contain-refers-resolves chain is replaced with a single cLinks relation. The cLinks relation can be thought of as a generic "uses" relationship between two entities in a program.